In the mid-1980’s MARSHALL LAW magazine asked me to share my miking technique with their readers. This article was written when tape was virtually the only medium used, so you may wish to substitute ‘medium of choice’ for the word ‘tape’, but the microphone preferences remain.
Of course, the 21st century has produced some remarkable new technologies with regard to amplification (guitar & otherwise). But if you’re looking to do it ‘the old fashioned’ was, read on.
 My primary aim when recording a Marshall amp is to capture 2 elements: its power (crunch and movement of air) and warmth (wood resonance). This unique combination is something one experiences when playing in front of a loud cabinet or stack, but It can be somewhat tricky to capture this on tape.
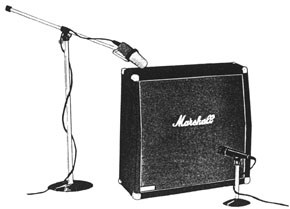
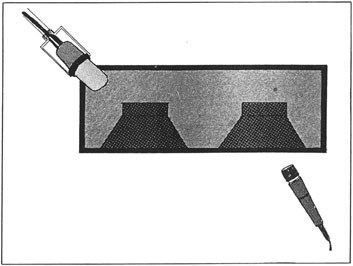
Recording the “crunch” character of a Marshall is the easy part. I generally use a Shure SM57 for the close mic, positioned at about a 30 degree angle (see illustration below).
When I use the term “warmth” in this context, I’m actually referring to the resonance produced by the vibrations of the wood cabinet itself. The difficulty of recording this characteristic has led me to discover a very interesting technique.
Microphone placement I’ve found that the most effective method for miking any sound is this: First, choose the microphone that is the most flattering to the sound of the instrument or amplifier. Then, walk all around the sound source, and wherever your ear perceives it most favorably, that’s where to place the microphone.
 Why a ribbon mic? From my earliest recording experiences, I’d always noticed that “low” horns like tubas and trombones were often miked with older ribbon mics like the classic RCA 44s and RCA 77s as they tend to favor the warmer tones of these instruments. For recording the Marshall cabinet’s resonance, it made sense to try one of these ribbon mics, since many of the frequencies I wanted to hear were the same as these low horns. Bingo! It worked like a charm.
Then, walking around the Marshall cabinet, I found there was a great deal of warm, resonant vibration occurring at the rear corners. Place the ribbon mic at a 45 degree angle to the back of the cabinet (see illustration). (For more ambient room sound you can add a third microphone placed further away – like a Neumann U87 or an AKG 414.)
A cautionary note: as the ribbons are quite delicate on these 44s and 77s, be careful not to put them too close to the speakers – they will absolutely fry and die!
e.r. 1985